The use of an overlay inventory has now been added to a stand alone directory which should help deployers understand how this could work within their environments. Inventory configuration has been updated to show this working in the various projects that have tests and could benefit from an overlay inventory. Change-Id: I1681fce160b43e9127851f06ae05ff5eaabe852f Signed-off-by: Kevin Carter <kevin.carter@rackspace.com> |
||
|---|---|---|
| .. | ||
| assets | ||
| conf.d | ||
| env.d | ||
| roles | ||
| tests | ||
| vars | ||
| .gitignore | ||
| ansible-role-requirements.yml | ||
| bootstrap-embedded-ansible.sh | ||
| installDB.yml | ||
| installKolideFleet.yml | ||
| installOSquery.yml | ||
| inventory.example.yml | ||
| README.rst | ||
| setupOSqueryPacks.yml | ||
| site-fleet.yml | ||
| site-osquery.yml | ||
| site.yml | ||
Install OSQuery and Kolide fleet
- tags
-
openstack, ansible
About this repository
This set of playbooks will deploy osquery and kolide-fleet. If this is being deployed as part of an OpenStack all of the inventory needs will be provided for.
These playbooks require Ansible 2.4+.
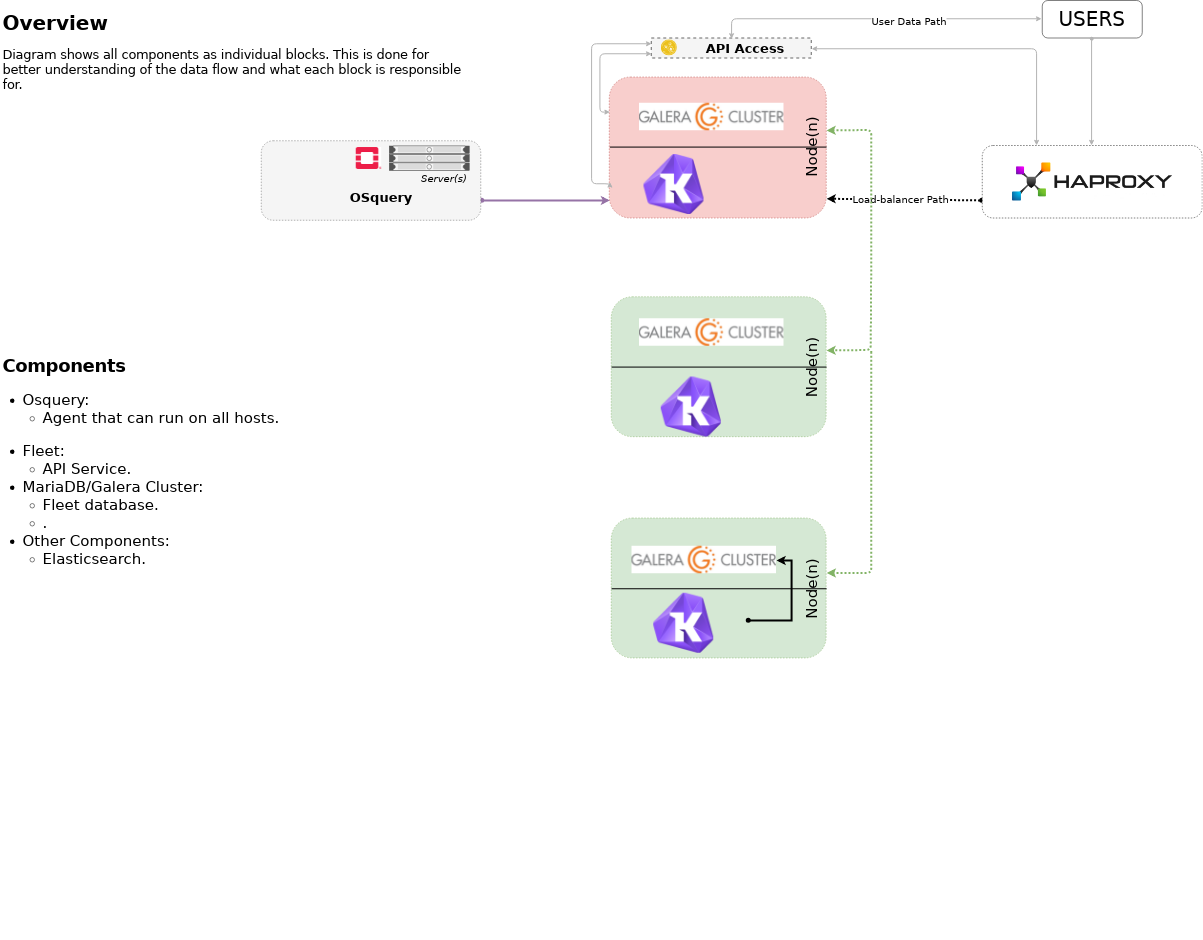
Highlevel overview of Osquery & Kolide Fleet infrastructure these playbooks will build and operate against.
OpenStack-Ansible Integration
These playbooks can be used as standalone inventory or as an
integrated part of an OpenStack-Ansible deployment. For a simple example
of standalone inventory see inventory.example.yml.
Setup | system configuration
Clone the osquery-osa repo
cd /opt
git clone https://github.com/openstack/openstack-ansible-ops
Copy the env.d file into place
cd /opt/openstack-ansible-ops/osquery
cp env.d/fleet.yml /etc/openstack_deploy/env.d/
Copy the conf.d file into place
cp conf.d/fleet.yml /etc/openstack_deploy/conf.d/In fleet.yml, list your logging hosts under fleet-logstash_hosts to create the kolide fleet cluster in multiple containers and one logging host under fleet_hosts to create the fleet container
vi /etc/openstack_deploy/conf.d/fleet.ymlCreate the containers
cd /opt/openstack-ansible/playbooks
openstack-ansible lxc-containers-create.yml --limit fleet_all
Update the /etc/hosts file (optional)
cd /opt/openstack-ansible/playbooks
openstack-ansible openstack-hosts-setup.yml
Create an haproxy entry for kolide-fleet service 8443
Add the following configuration item to the haproxy_extra_services variable within a user defined variable file.
haproxy_extra_services:
  - service:
      haproxy_service_name: kolide-fleet
      haproxy_ssl: False
      haproxy_backend_nodes: "{{ groups['kolide-fleet_all'] | default([]) }}"
      haproxy_port: 6443  # This is set using the "kolide_fleet_port" variable
      haproxy_check_port: 443  # This is set using the "kolide_fleet_port" variable
      haproxy_backend_port: 443  # This is set using the "kolide_fleet_port" variable
      haproxy_balance_type: tcp
With the appropriate haproxy configuration in place, setup haproxy to begin load balancing the traffic.
cd /opt/openstack-ansible/playbooks/
openstack-ansible haproxy-install.yml
Deploying | Installing with embedded Ansible
If this is being executed on a system that already has Ansible installed but is incompatible with these playbooks the script bootstrap-embedded-ansible.sh can be sourced to grab an embedded version of Ansible prior to executing the playbooks.
source bootstrap-embedded-ansible.shDeploying | Manually resolving the dependencies
This playbook has external role dependencies. If Ansible is not
installed with the bootstrap-ansible.sh
script these dependencies can be resolved with the
ansible-galaxy command and the
ansible-role-requirements.yml file.
- Example galaxy execution
ansible-galaxy install -r ansible-role-requirements.yml --roles-path=~/ansible_venv/repositories/rolesIn the even that some of the modules are alread installed execute the following
ansible-galaxy install -r ansible-role-requirements.yml --ignore-errors --roles-path=~/ansible_venv/repositories/rolesOnce the dependencies are set make sure to set the action plugin path to the location of the config_template action directory. This can be done using the environment variable ANSIBLE_ACTION_PLUGINS or through the use of an ansible.cfg file.
Deploying | The environment
Create some basic passwords keys that are needed by fleet
echo "kolide_fleet_db_password: $(openssl rand -base64 16)" > /etc/openstack_deploy/user_secrets.yml
echo "kolide_fleet_jwt_key: $(openssl rand -base64 32)" >> /etc/openstack_deploy/user_secrets.yml
echo "kolide_fleet_admin_password: $(openssl rand -base64 16)" >> /etc/openstack_deploy/user_secrets.yml
# NOTICE: This may already be defined
echo "galera_root_password: $(openssl rand -base64 16)" >> /etc/openstack_deploy/user_secrets.yml
Install master/data Fleet nodes on the elastic-logstash containers, deploy logstash, deploy Kibana, and then deploy all of the service beats.
cd /opt/openstack-ansible-ops/osquery
ansible-playbook site.yml -e@/etc/openstack_deploy/user_secrets.yml
If the installOSquery.yml playbook is executed with a limit, a single kolide-fleet host must be part of the limit. This requirement exists because the nodes running osquery require certificates to authenticate to the kolide-fleet cluster. Should a node within the kolide-fleet cluster not be part of the limit the playbooks will not be able to fetch the required certificates.
ansible-playbook installOSquery.yml $USER_VARS --limit 'host1,host2,kolide-fleet_all[0]'- The openstack-ansible command can be used if the version of ansible on the system is greater than 2.5. This will automatically pick up the necessary group_vars for hosts in an OSA deployment.
- If required add
-e@/opt/openstack-ansible/inventory/group_vars/all/all.ymlto import sufficient OSA group variables to define the OpenStack release. - Alternatively if using the embedded ansible, create a symlink to include all of the OSA group_vars. These are not available by default with the embedded ansible and can be symlinked into the ops repo.
ln -s /opt/openstack-ansible/inventory/group_vars /opt/openstack-ansible-ops/osquery/group_varsThe individual playbooks found within this repository can be independently run at anytime.
Local testing
To test these playbooks within a local environment you will need a single server with at leasts 8GiB of RAM and 40GiB of storage on root. Running an m1.medium (openstack) flavor size is generally enough to get an environment online.
To run the local functional tests execute the run-tests.sh script out of the tests directory. This will create a single node kolide-fleet cluster and install osquery on the local host.
CLUSTERED=yes tests/run-tests.shTo rerun the playbooks after a test build, source the tests/manual-test.rc file and follow the onscreen instructions.
To clean-up a test environment and start from a bare server slate the run-cleanup.sh script can be used. This script is disruptive and will purge all osquery related services within the local test environment.
tests/run-cleanup.shArchitecture | Data flow
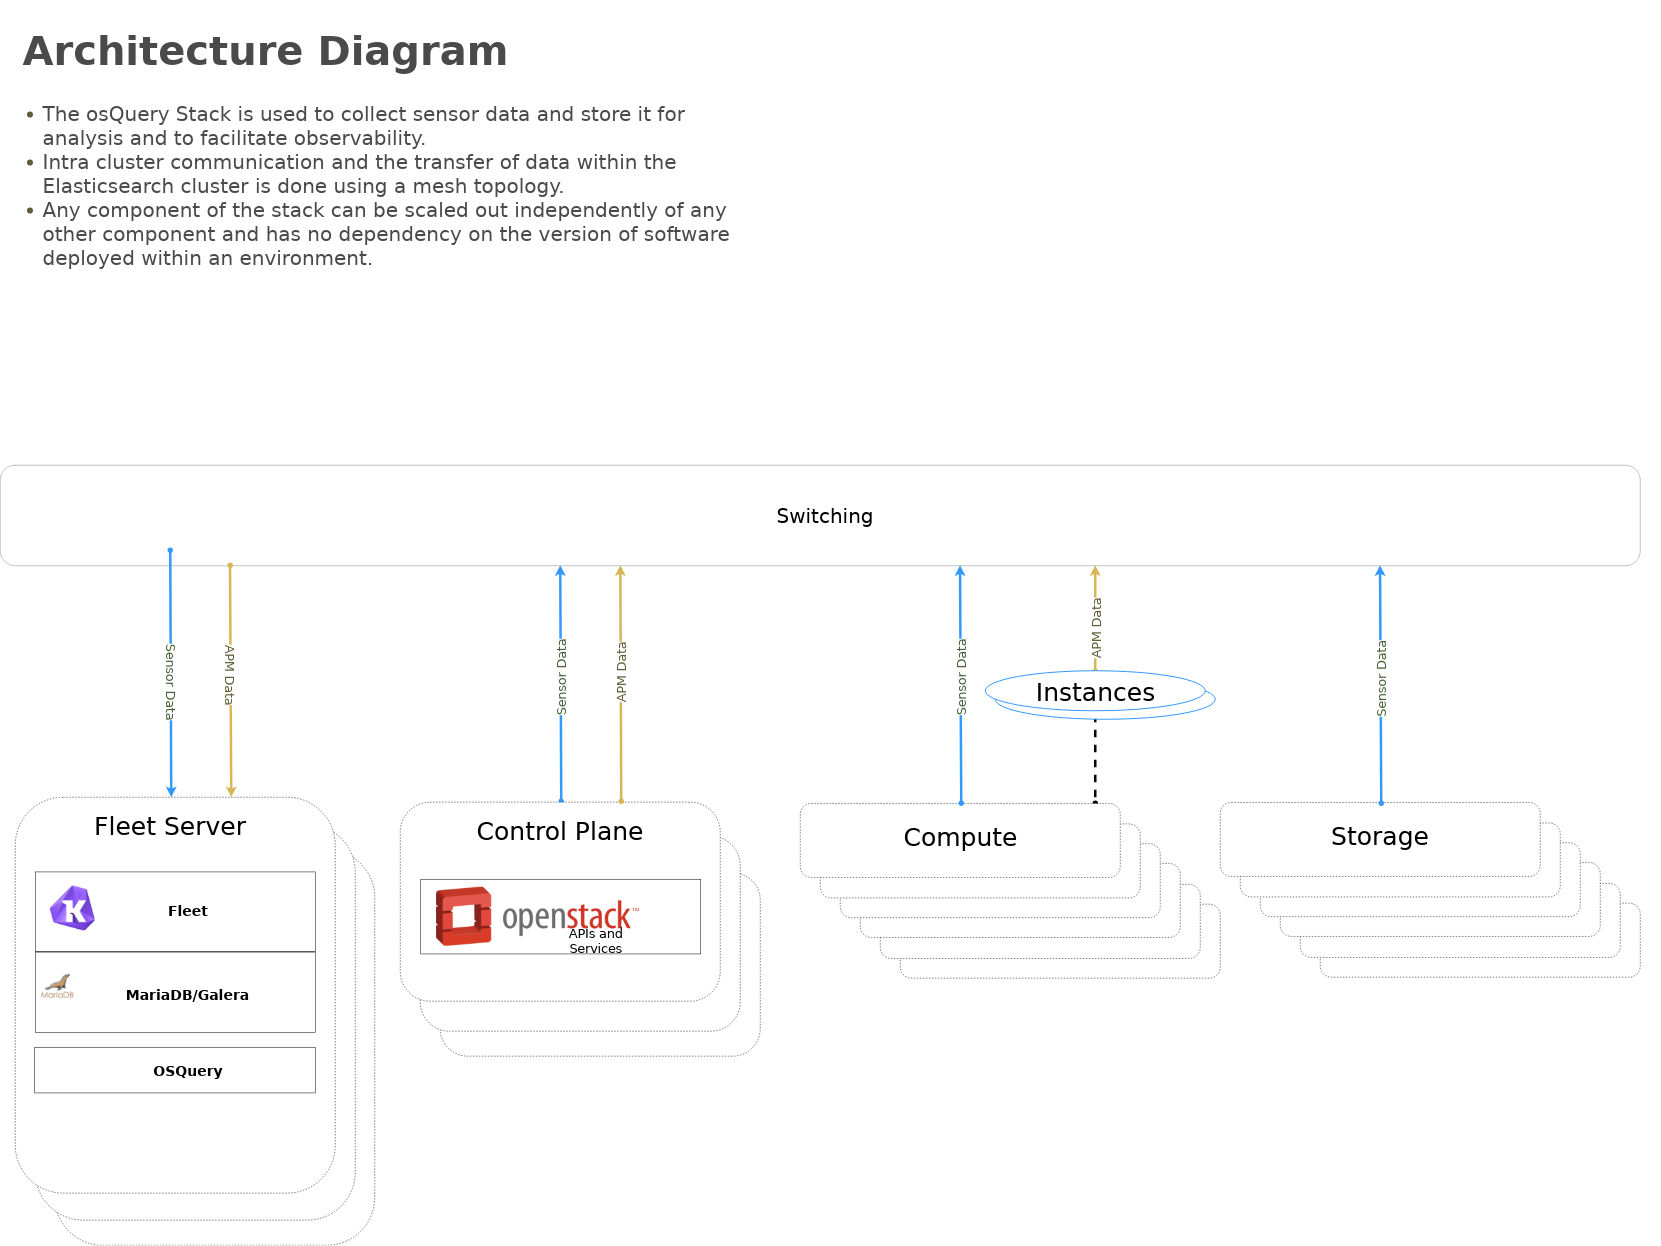
This diagram outlines the data flow from within an osquery deployment.

