6.9 KiB
Installation
The following instructions are ordered by ease of use, and our project recommendations.
Using rpm packages
There is currently no official Linux distribution packages.
The upstream project provides packages for a limited set of Linux distributions.
There are available at ftp://ftp.project-builder.org
As an example for Fedora 23 use the following:
As root get the repo file:
cd /etc/yum.repos.d && wget ftp://ftp.project-builder.org/fedora/23/x86_64/python-redfish.repoInstall using dnf:
dnf install python-redfish
Using pip and virtualenv
- Install virtualenv and virtualenvwrapper:
Fedora 22:
dnf install python-virtualenv python-virtualenvwrapperUbuntu 15.04:
apt-get install python-virtualenv virtualenvwrapper
Source virtualenvwrapper.sh:
. /usr/bin/virtualenvwrapper.sh
or:
. /usr/share/virtualenvwrapper/virtualenvwrapper.sh
Create a redfish virtual environement:
mkvirtualenv redfishInstall using pip:
pip install python-redfish
All files are installed under your virtualenv.
Using pip
Use:
sudo pip install python-redfishPip will install :
- The library and all dependencies into prefix/lib/pythonX.Y/site-packages directory
- redfish-client conf file into prefix/etc/redfish-client.conf. If prefix = '/usr' then force the configuration file to be in /etc
- Data files (templates) into prefix/share/redfish-client/templates
Point 2 and 3 above need root access to your system. If you don't have root access on your system, please follow Using pip and virtualenv section.
Using source code
Follow get the source code section to retrieve it.
Install from the source code using:
python setup.py install --prefix="/usr/local"
Building your own rpm packages
Inside the project tree there is a mechanism to build rpm packages for distributions.
The mechanism is based on project builder tool.
Follow get the source code section to retrieve it.
Download project builder for your distribution from ftp://ftp.project-builder.org.
Clone the project to your own github account.
Create a .pbrc with the following content, replace "/workspace/python/redfish" and "uggla" with your own directory and account:
$ cat .pbrc
pbdefdir python-redfish = $ENV{'HOME'}/workspace
pbconfdir python-redfish = $ENV{'HOME'}/workspace/python-redfish/pbconf
pbconfurl python-redfish = git+ssh://git@github.com:uggla/python-redfish.git
pburl python-redfish = git+ssh://git@github.com:uggla/python-redfish.git
Build the project:
pb -p python-redfish sbx2pkgor:
pb -p python-redfish sbx2pkg2insAll packages (srpm/rpm) should be available into the build directory, then install the package using rpm:
rpm -Uvh python-redfish/build/RPMS/python-redfish-devel20160213182552.rpm
Inventory file configuration
Verify redfish-client is working correclty:
redfish-client -hCreate a default entry to use the mockup:
redfish-client config add default default http://localhost:8000/redfish/v1Verify the entry is correctly registered:
redfish-client config showall
Note: The inventory file is created in $HOME/.redfish
Mockup installation
- Follow get the source code section to retrieve it.
- Install docker using your distribution packages or the docker procedure (docker provides more recent packages):
As an example for Fedora 23 use the following:
dnf install docker
systemctl enable docker.service
systemctl start docker.service
systemctl status docker.service
Jump into the dmtf directory.
Run ./buildImage.sh and ./run-redfish-simulator.sh
Check that a container is running and listening on port 8000:
$ docker ps
CONTAINER ID        IMAGE                      COMMAND                  CREATED             STATUS              PORTS                  NAMES
9943ff1d4d93        redfish-simulator:latest   "/bin/sh -c /tmp/redf"   3 weeks ago         Up 2 days           0.0.0.0:8000->80/tcp   redfish-simulator
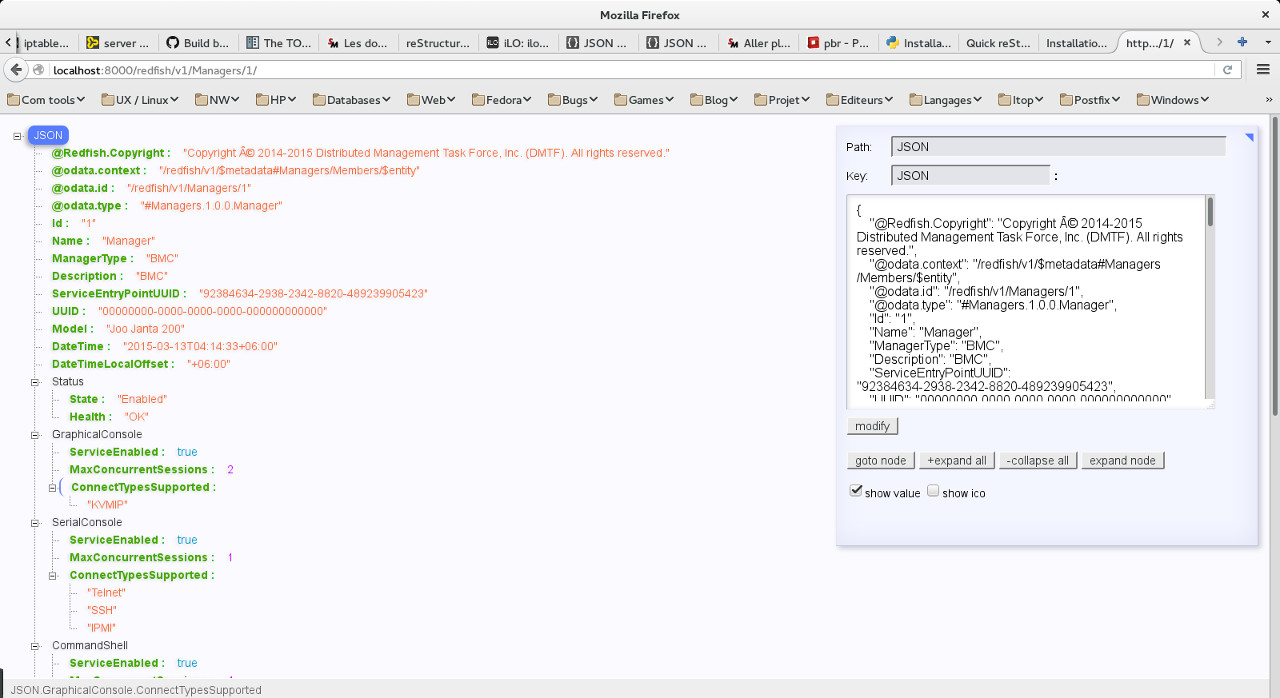
Try to connect using a navigator to http://localhost:8000 the following screen should apear.
Note : in the above screenshot, firefox JSON-handle extension is used. If you want the same presentation install the extension and refresh the page.
Testing against the mockup
Follow Inventory file configuration and Mockup installation section.
Run the following command:
redfish-client manager getinfo
The result should be like this:
$ redfish-client manager getinfo
Gathering data from manager, please wait...

Redfish API version :  1.00
Root Service

Managers information :
======================

Manager id 1:
UUID : 00000000-0000-0000-0000-000000000000
Type : BMC
Firmware version : 1.00
State : Enabled
Ethernet Interface :
    This manager has no ethernet interface
Managed Chassis :
    1
Managed System :
    1
----------------------------

Manager id 2:
UUID : 00000000-0000-0000-0000-000000000000
Type : EnclosureManager
Firmware version : Not available
State : Enabled
Ethernet Interface :
    This manager has no ethernet interface
Managed Chassis :
    Enc1
Managed System :
    2
----------------------------

Manager id 3:
UUID : 00000000-0000-0000-0000-000000000000
Type : EnclosureManager
Firmware version : Not available
State : Enabled
Ethernet Interface :
    This manager has no ethernet interface
Managed Chassis :
    Enc1
Managed System :
    2
----------------------------
Building local documentation
Building the html documentation locally.
Follow get the source code section to retrieve it.
Jump in the doc directory:
cd docBuild the html documentation:
make html
If you want to build the documentation in pdf.
Get texlive full distribution, e.g. on Fedora 23:
dnf install texlive-scheme-fullBuild the documentation:
make latexpdf
